50 Egg Decorating Ideas
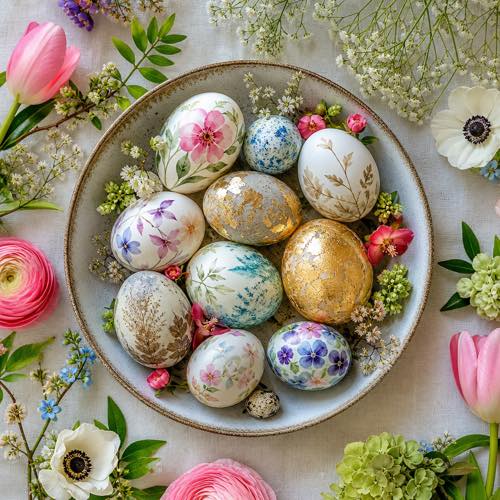
Few springtime crafts bring as much joy, nostalgia, and creative possibility as gathering around the table with a basket of fresh eggs and colorful supplies. Exploring creative egg decorating ideas is a beloved holiday tradition that unites families and crafters of every age. Whether crafting alongside toddlers or designing elegant heirloom centerpieces for Easter brunch, modern techniques offer endless inspiration.
Today, Easter egg decorating ideas extend far beyond standard vinegar dye tablets. Crafters embrace natural botanical stains, watercolor florals, gold leaf gilding, textured decoupage, and 3D embellishments. If you are searching for fresh ways to decorate eggs this spring, this roundup of 50 brilliant projects offers something for every skill level, budget, and aesthetic.
Egg Decorating Basics & Essential Preparation
Selecting the right egg canvas and mastering basic prep ensures your decorated eggs look stunning and last:
- Choosing Your Canvas: Real hard-boiled eggs are traditional and sturdy for edible treats. Blown-out real eggs allow you to preserve hollow shells as permanent keepsakes. Ceramic, wooden, or craft foam eggs offer a durable, shatter-resistant alternative for permanent displays.
- How to Hard-Boil for Decorating: Place white eggs in a saucepan, cover with cool water by an inch, bring to a rolling boil, remove from heat, cover, and let stand for 12 minutes. Transfer immediately to an ice bath to prevent cracking.
- How to Safely Blow Out an Egg: Pierce both ends of a raw egg with a clean pushpin. Wiggle the pin to break the yolk. Place a drinking straw over the top hole and blow gently over a bowl until empty. Rinse with warm vinegar water and let dry overnight.
- Essential Supplies: Keep white vinegar, painter’s tape, acrylic paint pens, soft brushes, Mod Podge, cotton swabs, and a drying rack on hand.
Classic Dyeing Techniques
Timeless immersion dyeing reimagined with modern gradient dips, vibrant kitchen ingredients, and fizzy chemical magic.
1. Ombré Dip-Dyed Eggs
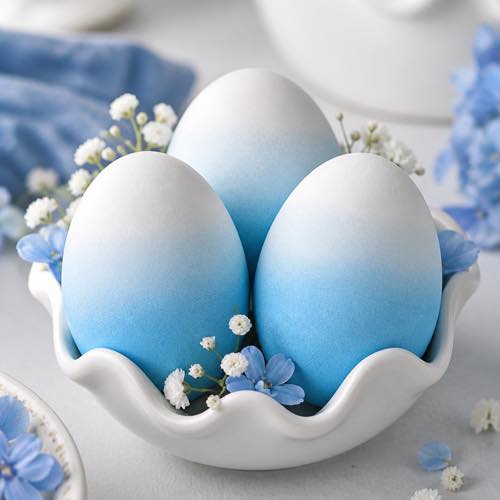
Smooth vertical color gradients that fade seamlessly from rich jewel tones at the base to soft pastel tints at the top.
- Materials: Liquid food coloring or dye, white vinegar, water, and tongs.
- Technique: Lower egg incrementally into concentrated dye, holding each level for 30 seconds to build gradient depth.
- Difficulty: Beginner
Quick Tip: Use a wire whisk loop to submerge and hold eggs steadily without leaving fingerprints.
2. Tie-Dye Paper Towel Eggs
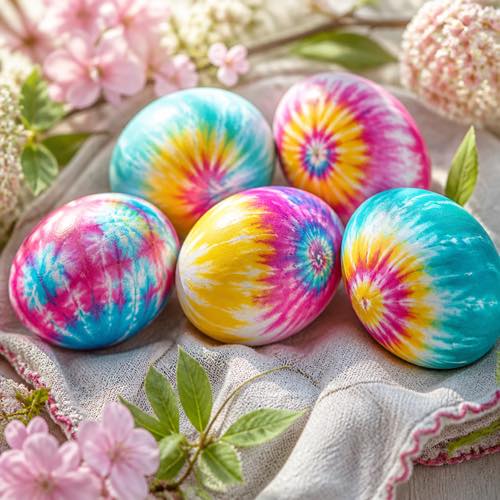
Vivid, psychedelic swirls of intermingling neon colors that look just like retro 1970s tie-dyed fabric.
- Materials: Paper towels, liquid food coloring, spray water bottle, rubber bands.
- Technique: Wrap damp eggs snugly in paper towels, drop food color directly onto paper, and rest for 15 minutes.
- Difficulty: Kids & Beginners
Quick Tip: Wear rubber gloves while unwrapping paper towels to keep bright dye off your fingers.
3. Natural Red Onion Skin Dye
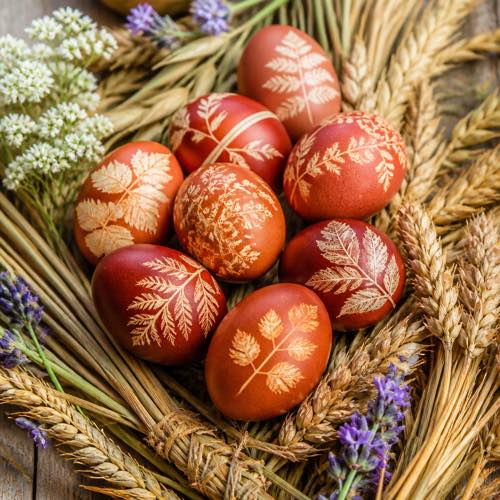
Rich, warm earthy tones of deep mahogany, copper, and amber achieved using everyday kitchen vegetable scraps.
- Materials: Skins of 6 red onions, boiling water, white vinegar, pantyhose, fresh herbs.
- Technique: Simmer skins in water with vinegar for 30 minutes, strain liquid, and steep eggs until richly stained.
- Difficulty: Intermediate
Quick Tip: Rub dry eggs with a drop of olive oil on a cloth for an antique satin sheen.
4. Whipped Cream Swirled Marbled Eggs

Dreamy, soft marble patterns with pastel swirls that look like gourmet confectioner candies.
- Materials: Canned whipped topping, gel food coloring, toothpick, glass baking dish.
- Technique: Spread cream in a dish, drop colors, swirl with a toothpick, and roll dry eggs through the mixture.
- Difficulty: Kids & Beginners
Quick Tip: Use whipped dairy cream instead of shaving cream if you plan to eat hard-boiled eggs afterward.
5. Golden Turmeric Sunburst Eggs
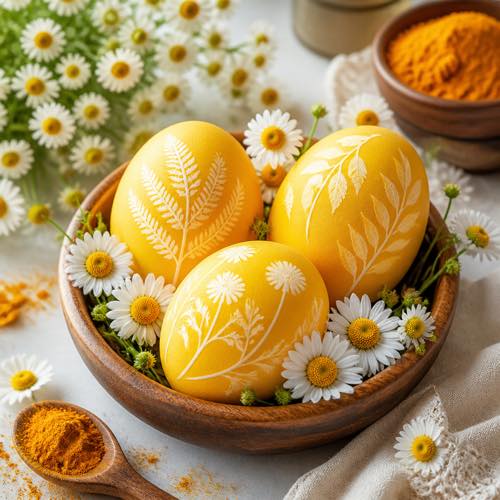
Luminous, golden-yellow eggs that radiate warmth, achieved entirely through organic pantry spices.
- Materials: 3 tablespoons ground turmeric, 2 cups boiling water, 2 tablespoons white vinegar.
- Technique: Whisk turmeric into simmering water, add vinegar, and steep white eggs for 25 minutes.
- Difficulty: Beginner
Quick Tip: Strain steeped turmeric water through a coffee filter before submerging eggs to avoid powdery spots.
6. Rich Beetroot Blush Pink Eggs
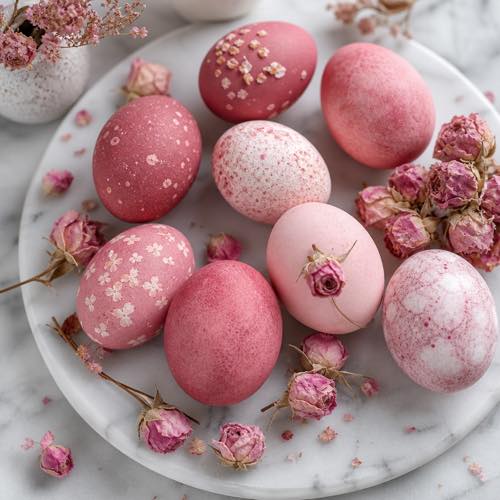
Soft dusty rose and romantic blush tones created with fresh shredded beets and natural vegetable pigments.
- Materials: 2 large fresh beets (chopped), water, white vinegar, glass steeping jar.
- Technique: Simmer beet chunks for 25 minutes, strain broth, stir in vinegar, and soak eggs in the refrigerator.
- Difficulty: Beginner
Quick Tip: Soak eggs for 10 minutes for soft ballet pink, or leave overnight for deep cranberry wine.
7. Baking Soda Fizzy Volcano Dye
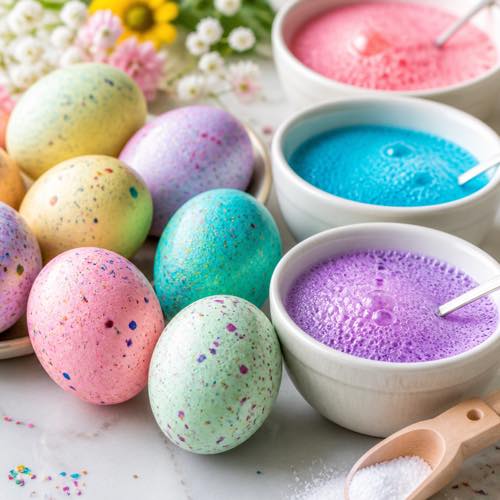
Thick, textured color splatters and speckled patterns created through an exciting, bubbling sensory science experiment.
- Materials: Baking soda, food coloring, white vinegar, droppers or paintbrushes.
- Technique: Paint eggs with colored baking soda paste, then drop vinegar over them to create an active fizz.
- Difficulty: Kids
Quick Tip: Conduct this craft inside a rimmed baking sheet to contain the fun bubbling reaction.
Painted Egg Designs
Intricate acrylic brushwork, modern geometric patterns, expressive watercolor washes, and charming storybook characters.
8. Delicate Watercolor Meadow Florals

Romantic hand-painted meadow wildflowers with soft, translucent watercolor brushstrokes on a matte white eggshell.
- Materials: Watercolor paints, ultra-fine round brush, matte blown-out or ceramic eggs.
- Technique: Dab watery pigment to create spontaneous petals, then define delicate leaves with fine green brushes.
- Difficulty: Intermediate
Quick Tip: Use matte ceramic or craft eggs; watercolor adheres significantly better to chalky matte surfaces.
9. Crisp Geometric Color Blocking
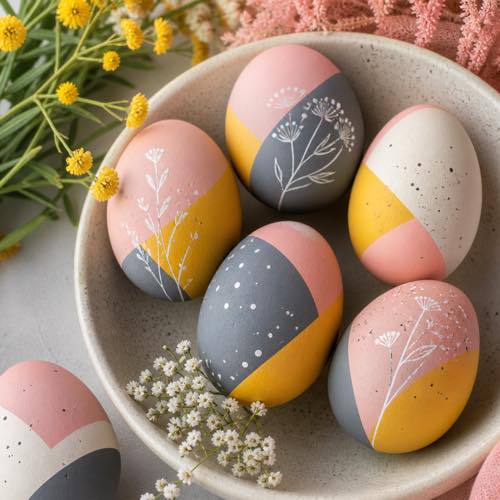
Modern Scandinavian-inspired designs featuring razor-sharp diagonal color blocks and bold graphic contrasts.
- Materials: Washi painter’s tape, matte acrylic paints, flat shader brush.
- Technique: Apply painter’s tape at sharp angles, paint exposed sections, let dry thoroughly, and peel tape cleanly.
- Difficulty: Beginner to Intermediate
Quick Tip: Burnish tape edges down firmly with a fingernail to prevent paint bleeding beneath.
10. Hand-Painted Cherry Blossoms
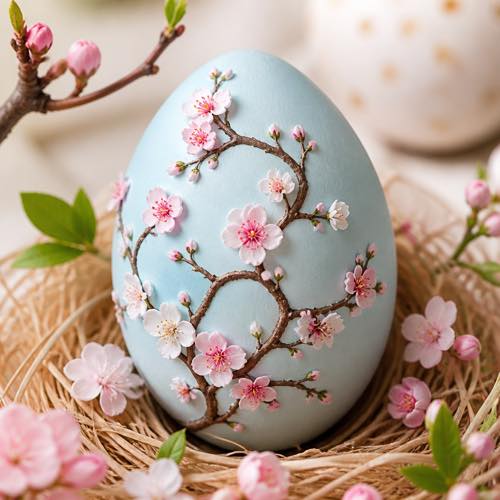
Elegant Asian-inspired branch motifs featuring miniature cherry blossoms painted against a soft sky-blue backdrop.
- Materials: Pastel blue base dye, brown and pink acrylic paints, wooden toothpick.
- Technique: Paint organic branching twigs in dark brown, then dot five-petal pink clusters using a toothpick.
- Difficulty: Intermediate
Quick Tip: Add a tiny dot of darker magenta in the center of each blossom for dimensional depth.
11. Playful Retro Polka Dots
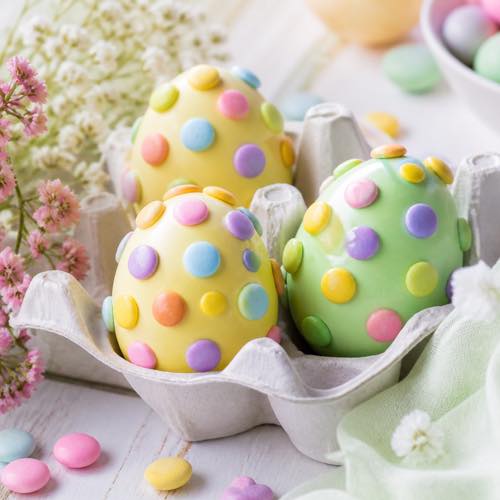
Cheerful retro polka dots in contrasting pastel and bright hues that look like vintage confectioner candies.
- Materials: Acrylic paints, unsharpened pencil eraser, or nail art dotting stylus.
- Technique: Dip the round rubber flat end of a pencil eraser into acrylic paint and stamp directly onto the egg.
- Difficulty: Kids & Beginners
Quick Tip: Wipe the pencil eraser clean on a paper towel between stamps to keep dots uniform.
12. Woodland Bunny & Fox Faces
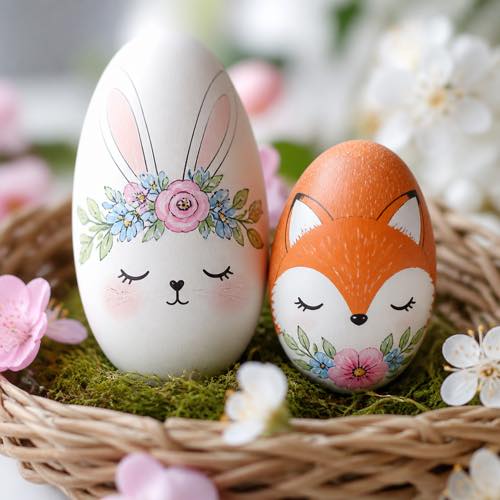
Adorable storybook woodland creatures with sleeping eye curves, rosy blushed cheeks, and sweet animal ears.
- Materials: Acrylic paint pens, pink chalk pastel, craft felt for ears, craft glue.
- Technique: Draw facial curves with fine black pens, smudge soft pink chalk onto cheeks, and glue felt ears.
- Difficulty: Beginner
Quick Tip: Use a cotton swab dipped in powdered pink blush to smudge instant, velvety bunny cheeks.
13. Acrylic Gingham Plaid Eggs
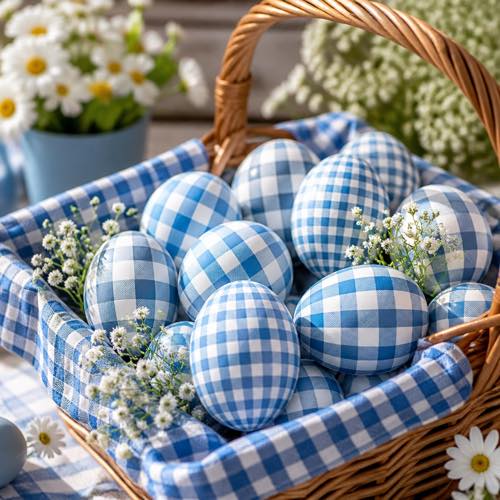
Classic farmhouse French gingham plaid featuring overlapping horizontal and vertical lines in pastel shades.
- Materials: Flat synthetic chisel brush, pastel acrylic paint, steady hand guide.
- Technique: Paint parallel horizontal stripes in light paint, cross with vertical stripes, and darken intersections.
- Difficulty: Advanced
Quick Tip: Mix your main color with glazing medium so stripes remain translucent where they intersect.
14. Impressionist Oil Paint Dab Eggs
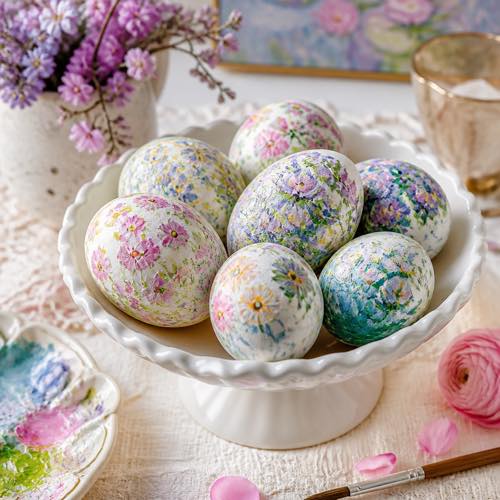
Textured, colorful miniature brush marks inspired by Monet’s impressionist gardens and shimmering water lilies.
- Materials: Heavy-body acrylic paints in lilac, chartreuse, and sky blue, small filbert brush.
- Technique: Apply thick, rhythmic dabs of multi-toned paint directly across the shell, leaving white space between clusters.
- Difficulty: Beginner to Intermediate
Quick Tip: Avoid over-blending brush dabs; distinct strokes create the signature impressionist effect.
Metallic & Glam Accents
Gleaming gold leaf gilding, liquid metal drips, glittering crystals, and opulent jewel-toned holiday luxury.
15. Gilded 24K Gold Leaf Eggs
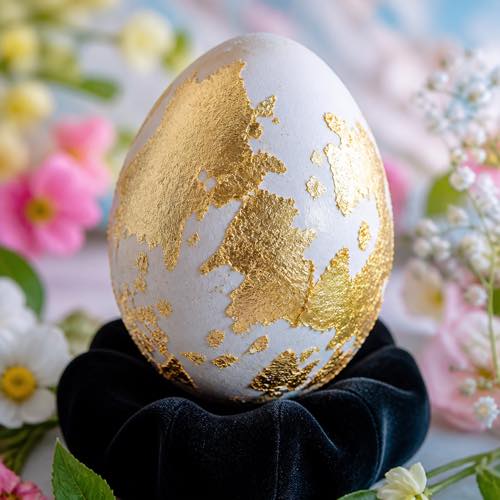
High-end artisanal eggs featuring organically torn, jagged flakes of gleaming gold leaf over raw chalky shells.
- Materials: Imitation gold leaf sheets, metal leaf adhesive size, soft dry mop brush.
- Technique: Dab adhesive irregularly over egg, let turn tacky, press leaf down, and burnish away excess.
- Difficulty: Intermediate
Quick Tip: Don’t try to make foil edges perfectly neat; organic, irregular fractures look far more luxurious.
16. Metallic Liquid Foil Drip Eggs

Dramatic modern contrast with molten metallic gold or copper dripping over deep charcoal or pure white eggs.
- Materials: Metallic liquid acrylic enamel, matte base-painted eggs, dropper.
- Technique: Place egg upright in an egg holder, pool metallic paint at top tip, and let gravity draw drips downward.
- Difficulty: Beginner
Quick Tip: Place eggs on inverted bottle caps to dry undisturbed while metallic enamel cures.
17. Iridescent Holographic Glitter Eggs
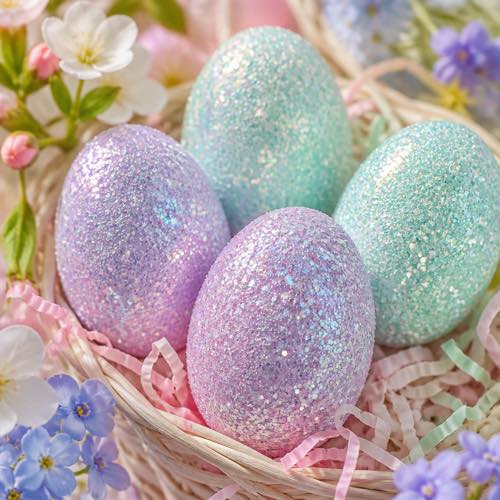
Dazzling, fully coated eggs that shimmer with multi-colored rainbow reflections when caught in sunlight.
- Materials: Extra-fine holographic craft glitter, Mod Podge gloss, foam brush.
- Technique: Coat egg in gloss Mod Podge, spoon glitter generously over all sides, and shake off excess.
- Difficulty: Beginner
Quick Tip: Spray dried glitter eggs with clear acrylic lacquer to lock sparkles in place.
18. Rose Gold Dipped Eggs
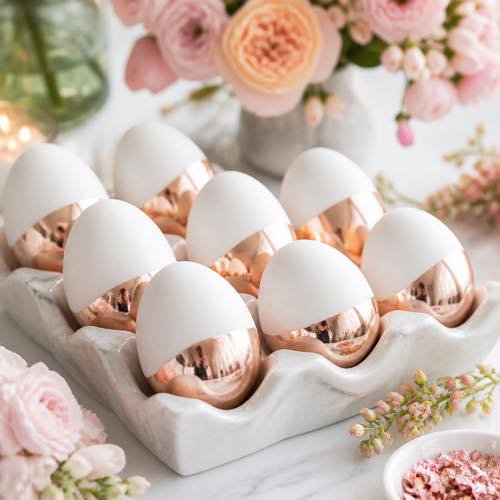
Clean, chic minimalist eggs dipped at a modern diagonal angle into lustrous, reflective rose gold enamel.
- Materials: Metallic rose gold liquid paint, white eggs, shallow container.
- Technique: Submerge bottom half of each egg at a 45-degree tilt, lift straight up, and let excess drain.
- Difficulty: Beginner
Quick Tip: Suspend eggs upside down with painter’s tape while dipped sections cure to prevent puddles.
19. Velvet Matte & Copper Leaf
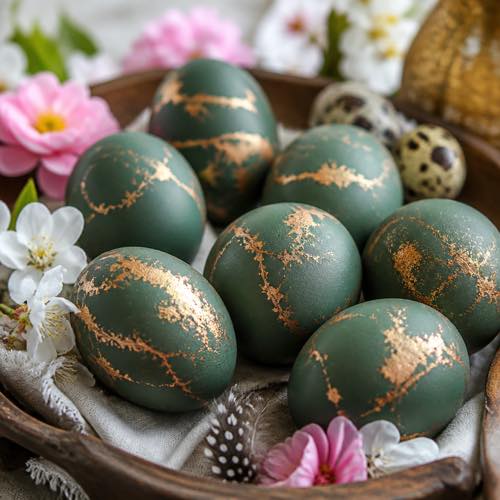
Opulent moody eggs combining tactile chalkboard-matte jewel tones with warm, flickering veins of copper foil.
- Materials: Chalkboard paint (forest green or navy), copper leaf flakes, gilding glue.
- Technique: Paint solid matte jewel-tone base, paint thin crackle lines of glue, and press copper leaf.
- Difficulty: Intermediate
Quick Tip: Chalkboard paint gives a velvety ultra-matte texture that contrasts brilliantly against copper.
20. Jewel-Toned Gem Encrusted Eggs

Imperial Fabergé-inspired showstoppers decorated with bands of glistening rhinestones, faux pearls, and gold trim.
- Materials: Deep purple acrylic paint, flat-backed craft rhinestones, precision craft glue, wax gem pen.
- Technique: Paint rich jewel-tone egg, outline bands with glue, and set crystals using a wax picker tool.
- Difficulty: Advanced
Quick Tip: Work in small 1-inch sections so craft glue remains tacky while positioning tiny rhinestones.
21. Champagne Shimmer Pearl Glaze Eggs

Subtle, ethereal eggs that look like natural saltwater pearls with soft champagne and ivory iridescence.
- Materials: Pearlescent acrylic glaze, natural white eggs, makeup blending sponge.
- Technique: Stipple thin layers of pearlescent medium over white eggs with a damp makeup sponge.
- Difficulty: Beginner
Quick Tip: Apply two ultra-thin stippled coats rather than one heavy layer to prevent streaks.
Patterned & Textured Creations
Intricate napkin decoupage, washi tape mosaics, cozy string wraps, and traditional wax-resist heirlooms.
22. Washi Tape Mosaic Patchwork Eggs
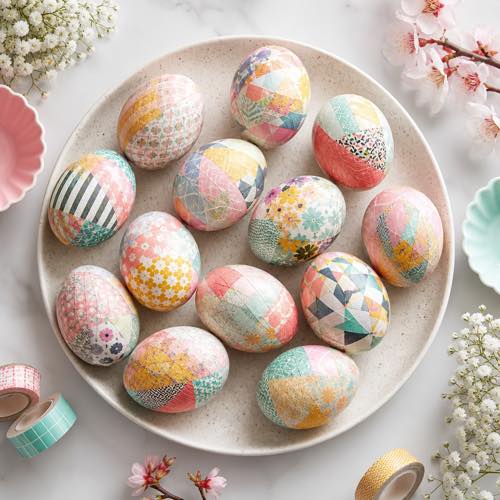
Zero-mess geometric mosaic eggs decorated with colorful strips and triangles of patterned Japanese washi paper tape.
- Materials: Patterned washi tapes, craft scissors, wooden or blown-out eggs.
- Technique: Snip washi tape into small geometric shapes, smoothing pieces over egg curves in a mosaic.
- Difficulty: Kids & Beginners
Quick Tip: Seal completed washi eggs with matte Mod Podge to keep paper edges from peeling over time.
23. Botanical Paper Napkin Decoupage

Gorgeous vintage porcelain-style eggs created by seamlessly transferring delicate floral patterns from paper party napkins.
- Materials: Printed 3-ply paper napkins, Mod Podge matte, soft flat brush, white eggs.
- Technique: Separate napkin layers to use top printed ply, cut motifs, smooth onto egg with Mod Podge, and dry.
- Difficulty: Intermediate
Quick Tip: Tear napkin motifs with fingers instead of scissors; feathered edges blend seamlessly into the shell.
24. Colorful Baker’s Twine Wrapped Eggs
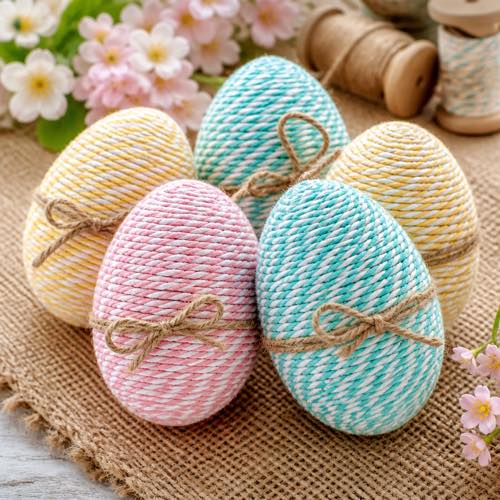
Charming country-chic eggs wrapped in spiral coils of colored cotton baker’s twine or natural jute string.
- Materials: Colored cotton baker’s twine, craft glue or hot glue, wooden or craft foam eggs.
- Technique: Anchor twine at top tip with glue, wrap tightly in continuous spirals down shell, gluing intermittently.
- Difficulty: Beginner
Quick Tip: Use wooden or foam eggs for twine wrapping, as real eggshells can crack under tight tension.
25. Delicate Vintage Lace Stencil Eggs

Delicate heirloom patterns created by wrapping textured vintage lace around white eggs before dipping in dye.
- Materials: Vintage lace trim or tights, rubber bands, food coloring dye bath, white eggs.
- Technique: Wrap scrap lace tightly around egg, secure with a rubber band, submerge into dark dye, and remove lace.
- Difficulty: Intermediate
Quick Tip: Ensure lace is stretched completely flush against eggshell so dye cannot bleed underneath.
26. Traditional Wax-Resist Pysanky Eggs

Breathtaking Ukrainian folk art created using layered beeswax resist and sequential progressive dye baths.
- Materials: Kistka stylus tool, pure beeswax, aniline dyes, candle flame, blown-out eggs.
- Technique: Draw lines with melted beeswax from lightest to darkest dye baths, melting off wax at the end.
- Difficulty: Advanced
Quick Tip: Work from lightest dye (yellow) to darkest (black), sealing each color layer with beeswax.
27. Embossed 3D Puffy Paint Filigree Eggs

Tactile, dimensional eggs decorated with raised dots, scrolls, and filigree that look just like bakery royal icing.
- Materials: Dimensional craft fabric paint (puffy paint) with fine writer tip, dyed eggs.
- Technique: Squeeze fine beads of puffy paint directly onto dried eggs to pipe lace garlands and scrolls.
- Difficulty: Beginner to Intermediate
Quick Tip: Practice piping pressure on cardboard first to avoid sudden paint air bubbles on your egg.
28. Crushed Dyed Eggshell Mosaic
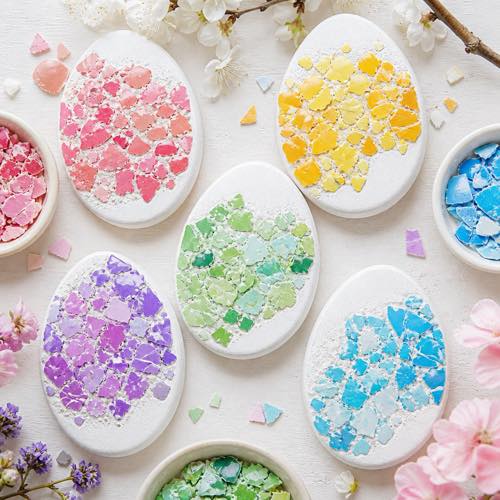
Textured mosaic eggs created by gluing brightly dyed, crushed eggshell fragments onto plain white eggs.
- Materials: Dyed leftover eggshells (crushed into flakes), Mod Podge, tweezers, white eggs.
- Technique: Brush glue onto egg, pick up colored shell pieces with tweezers, and press into place leaving gaps.
- Difficulty: Intermediate
Quick Tip: Dye several hollow shells in bold dark colors before crushing to create high-contrast mosaic tiles.
Natural & Botanical Inspirations
Pressed spring wildflowers, fresh garden herb silhouettes, preserved sheet moss, and realistic speckled bird eggs.
29. Pressed Wildflower Keepsake Eggs
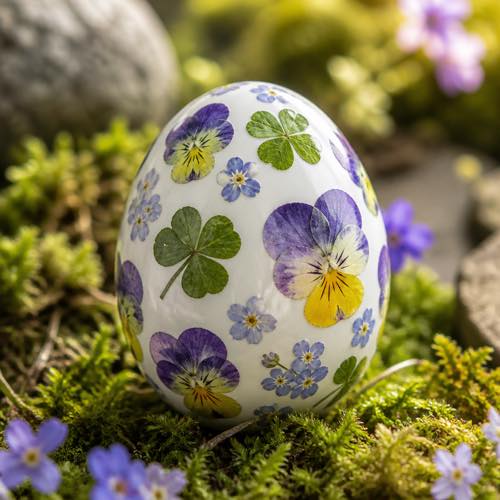
Artisanal heirloom eggs adorned with real pressed spring wildflowers, miniature pansies, and clover leaves.
- Materials: Dried pressed flowers, Mod Podge matte, soft watercolor brush, blown-out eggs.
- Technique: Paint a thin layer of adhesive on shell, place dried petals with tweezers, and seal with a topcoat.
- Difficulty: Intermediate
Quick Tip: Press tiny garden blooms in a heavy book between parchment sheets for five days before crafting.
30. Fresh Herb Silhouette Resist Dyeing

Earthy botanical eggs showing crisp negative-space silhouettes of parsley, dill sprigs, and clover leaves.
- Materials: Fresh flat parsley or dill leaves, sheer nylon stockings, food or natural dye, white eggs.
- Technique: Dampen herb sprigs, smooth against eggshell, stretch nylon tightly over egg, and submerge in dye.
- Difficulty: Beginner to Intermediate
Quick Tip: Use flat Italian parsley or miniature fern fronds; curly herbs don’t lay flat enough against shells.
31. Preserved Sheet Moss Rustic Eggs

Earthy woodland eggs decorated with textured patches of preserved green forest moss and natural twine.
- Materials: Preserved sheet moss, craft glue or hot glue, wooden eggs, twine.
- Technique: Tear moss into organic patches, glue onto lower half of wooden eggs, and wrap center with jute cord.
- Difficulty: Beginner
Quick Tip: Mist preserved moss lightly with water beforehand to make it pliable and easy to wrap.
32. Robin’s Egg Speckled Blue
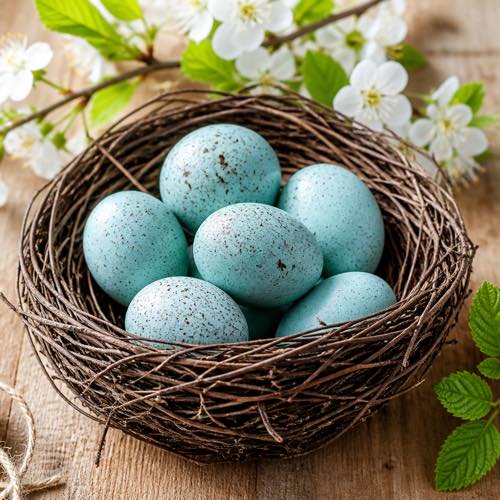
Authentic, natural-looking songbird eggs dyed in soft cyan blue and flecked with realistic brown speckles.
- Materials: Light blue dye, brown acrylic paint, stiff toothbrush or splatter brush.
- Technique: Dye eggs pale sky blue, let dry, then flick a toothbrush dipped in watery brown paint across shells.
- Difficulty: Beginner
Quick Tip: Practice flicking toothbrush bristles onto a paper towel first to ensure speckles come out fine.
33. Dried Lavender Blossom Wrapped Eggs
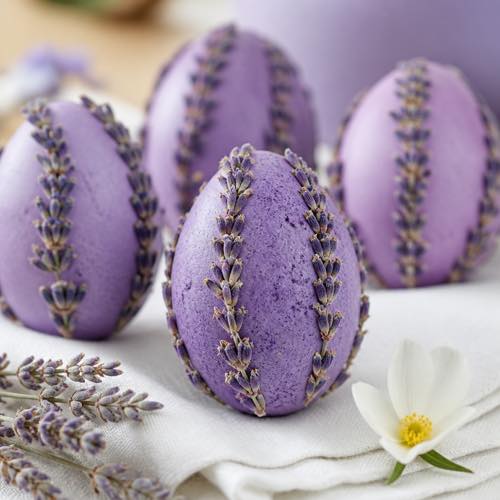
Fragrant Provencal eggs accented with aromatic dried French lavender blossoms and delicate purple thread.
- Materials: Pastel lilac dye, dried lavender flowers, craft glue, purple embroidery floss.
- Technique: Dye eggs soft lavender, brush thin glue stripes, sprinkle dried lavender buds, and press gently.
- Difficulty: Beginner
Quick Tip: Natural dried lavender buds provide a wonderful, calming spring scent to tabletop Easter baskets.
34. Natural Feathers & Burlap Eggs

Chic farmhouse eggs that celebrate un-dyed brown chicken shells paired with rustic burlap and speckled bird feathers.
- Materials: Brown farm fresh eggs, 1/2-inch burlap ribbon, speckled craft feathers, glue dot.
- Technique: Wrap burlap ribbon around egg equator, glue in place, and tuck a speckled feather behind the band.
- Difficulty: Beginner
Quick Tip: Use real brown or speckled heritage eggs for an organic farm-to-table look without dye.
35. Terracotta Clay Matte Dipped Eggs
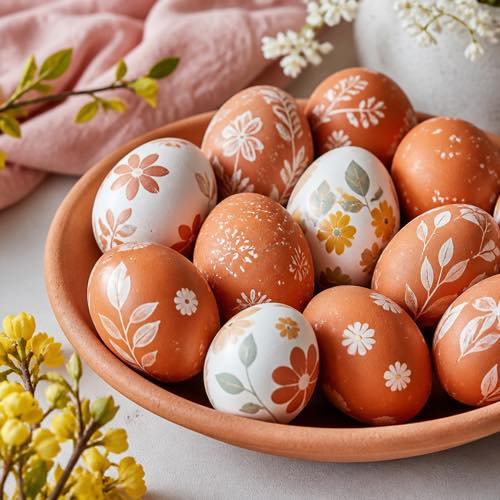
Warm, modern Mediterranean eggs painted in earthy terracotta, rust, and ochre clay tones with a chalky finish.
- Materials: Terracotta chalk paint, raw eggs, fine sanding sponge.
- Technique: Coat eggs with two layers of terracotta chalk paint, then buff lightly with a dry sponge.
- Difficulty: Beginner
Quick Tip: Mix a teaspoon of baking soda into acrylic paint to create a genuine textured earthenware clay finish.
Kids’ & Fun Playful Ideas
Googly-eye monsters, magical melted crayon resist, bright emoji faces, and crackled prehistoric dinosaur eggs.
36. Googly-Eye Monster Eggs

Hilarious, wacky monster eggs loaded with multi-sized shakeable googly eyes and drawn cartoon monster grins.
- Materials: Neon food coloring, multi-pack plastic googly eyes, black permanent marker, glue dots.
- Technique: Dye eggs in neon lime and purple, stick clusters of googly eyes on each egg, and draw silly mouths.
- Difficulty: Kids & Beginners
Quick Tip: Use self-adhesive peel-and-stick googly eyes so small children can decorate without messy glue bottles.
37. Melted Crayon Hot Wax Resist Eggs

Vibrant rainbow droplets and glossy textured swirls created by drawing with wax crayons on hot boiled eggs.
- Materials: Freshly boiled hot eggs, standard wax crayons, egg cartons.
- Technique: Press wax crayons against steaming hot eggs; heat instantly melts wax into vibrant drippy art.
- Difficulty: Kids (with adult supervision)
Quick Tip: Keep hot eggs resting inside carton cups while coloring so children do not hold hot shells.
38. Cheerful Yellow Emoji Face Eggs

Instantly recognizable, fun yellow emoji eggs showing heart eyes, laughing tears, and cool sunglasses.
- Materials: Yellow egg dye or acrylic paint, red, blue, and black paint pens.
- Technique: Dye eggs solid bright emoji yellow, let dry, then draw facial expressions with colored paint markers.
- Difficulty: Kids & Beginners
Quick Tip: Draw sunglasses with black marker first, then add white accent lines on lenses for reflective shine.
39. Crackled Prehistoric Dinosaur Eggs

Exciting prehistoric dinosaur eggs with vibrant colored spiderweb veins running directly through edible whites.
- Materials: Hard-boiled eggs, back of a metal spoon, dark liquid food coloring, water, vinegar.
- Technique: Gently tap eggshells with a spoon to fracture shell, submerge in dark dye for 4 hours, and peel.
- Difficulty: Kids & Beginners
Quick Tip: These are 100% edible and look incredible served as deviled eggs for Easter lunch.
40. Puffy Bunny Ears & Pom-Pom Tail Eggs
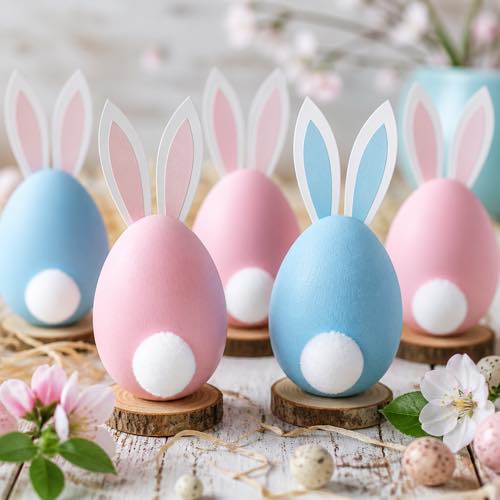
Cute 3D bunny eggs featuring pastel painted shells, upright cardstock ears, and a fluffy pom-pom tail behind.
- Materials: White cardstock, pastel acrylic paint, white craft pom-poms, glue dots.
- Technique: Cut bunny ear shapes from cardstock, glue to egg top crown, and adhere a soft pom-pom tail to back.
- Difficulty: Kids & Beginners
Quick Tip: Cut egg carton cups into single pedestals so these adorable bunny eggs stand upright without tipping.
41. Fingerprint Flower Family Eggs
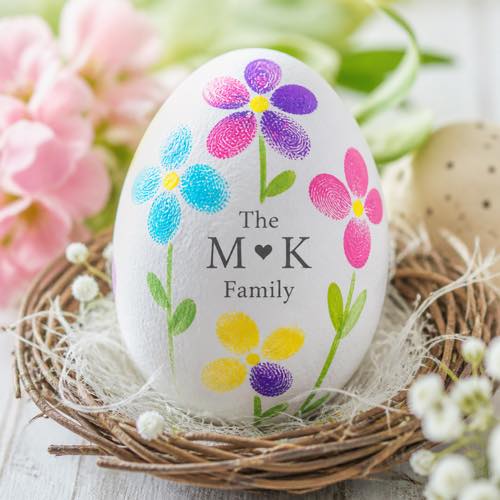
Heartwarming family keepsake eggs featuring colorful flower petals stamped with children’s actual fingerprints.
- Materials: Non-toxic washable stamp pads or craft acrylics, fine-tip black pen, white eggs.
- Technique: Press child’s pinky into stamp ink, press around a central point to create petals, and draw stems.
- Difficulty: Toddlers & Kids
Quick Tip: Write the child’s name and year in fine archival ink on the bottom of the egg as a treasured keepsake.
42. Glow-in-the-Dark Cosmic Eggs
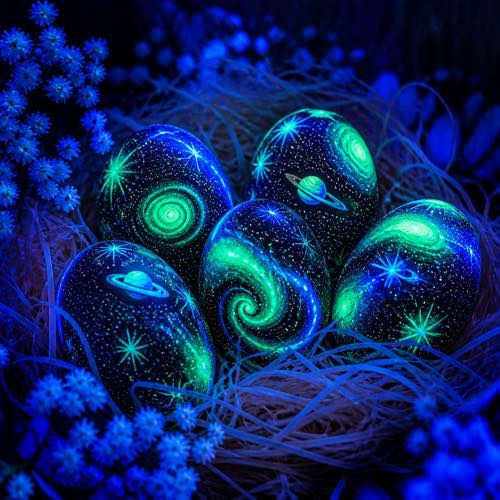
Magical nighttime eggs that absorb room light and glow brilliantly with cosmic greens and blues in the dark.
- Materials: Phosphorescent glow-in-the-dark acrylic paint, black base paint, fine brushes.
- Technique: Paint eggs with dark background, then splatter and swirl two thick coats of glow paint over shell.
- Difficulty: Kids & Beginners
Quick Tip: Charge painted eggs under a desk lamp for 10 minutes before turning off lights for an outdoor hunt.
43. Colorful Felt Spring Chick Eggs
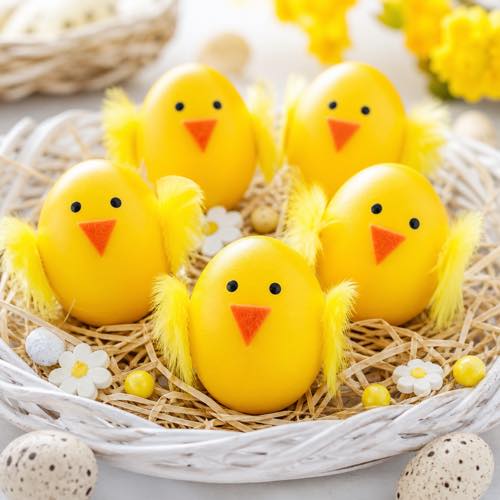
Sweet baby spring chick eggs featuring bright yellow shells, soft feather wings, and tiny orange felt beaks.
- Materials: Yellow food dye, orange craft felt scraps, yellow craft feathers, black marker, glue dots.
- Technique: Dye eggs bright yellow, glue two yellow feathers to sides, attach an orange felt beak, and dot eyes.
- Difficulty: Kids
Quick Tip: Use double-sided glue dots instead of hot glue so young children can attach feathers completely safely.
Elegant & Modern Aesthetics
Minimalist continuous line art, liquid nail polish marbling, Scandinavian folk motifs, and sleek architectural color blocking.
44. Minimalist Black Ink Line Art Eggs
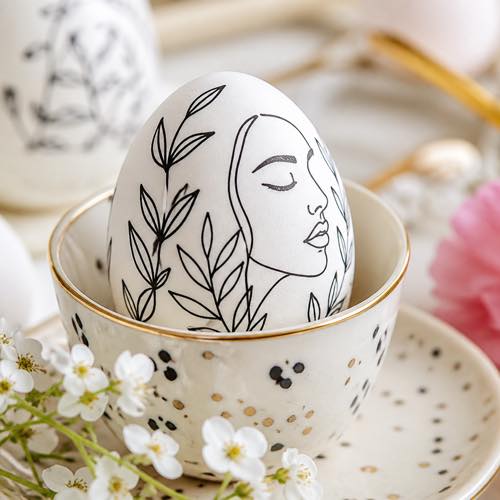
Chic, gallery-worthy eggs featuring continuous single-line Picasso-style facial contours and abstract botanical sketches.
- Materials: Ultra-fine 0.3mm waterproof black pigment pen, chalky white craft or blown-out eggs.
- Technique: Draw flowing, uninterrupted line art profiles and organic eucalyptus branches directly onto shell.
- Difficulty: Intermediate
Quick Tip: Lightly sketch line art with a 2H pencil first; pencil marks erase cleanly with a vinyl eraser.
45. Swirled Nail Polish Water Marble Eggs
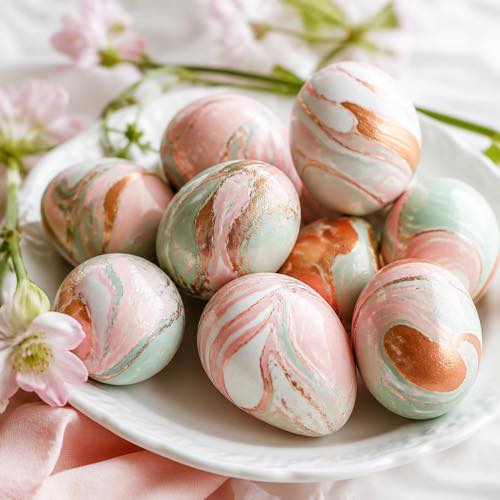
Dramatic, high-gloss marble ribbons created by dipping eggs into swirling drops of floating nail polish.
- Materials: Disposable plastic cup, room-temperature water, assorted nail polishes, toothpick, blown eggs.
- Technique: Drip polish onto water surface, swirl film with toothpick, submerge egg in one motion, and pull out.
- Difficulty: Intermediate
Quick Tip: Water MUST be room temperature; cold water makes nail polish sink instead of spreading across surface.
46. Scandinavian Nordic Folk Art Motifs
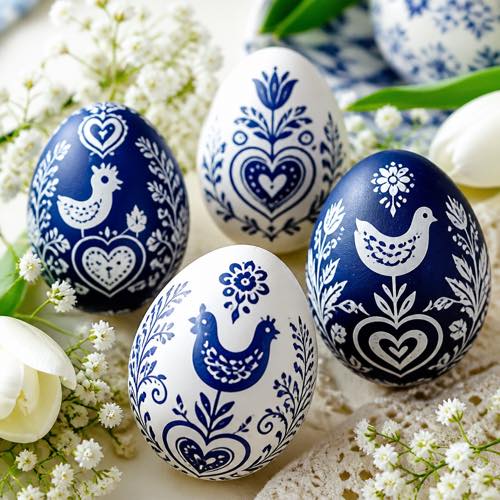
Whimsical Nordic folk art designs featuring symmetrical painted birds, stylized tulips, and crisp floral medallions.
- Materials: Deep indigo or navy blue egg dye, opaque white acrylic paint pen (0.7mm tip).
- Technique: Dye eggs navy, allow to dry completely, then draw symmetrical Nordic birds and flower petals.
- Difficulty: Intermediate to Advanced
Quick Tip: Draw a faint center guideline in pencil to keep symmetrical folk art motifs balanced across sides.
47. Matte Monochrome Black & White Eggs

Ultra-chic modern monochrome eggs sporting minimalist grids, bold checkerboards, and clean hand-drawn brush splatters.
- Materials: Chalkboard black paint, white chalk pens, white acrylic eggs.
- Technique: Paint contrasting halves or stripes using black and white, adding geometric graph lines.
- Difficulty: Beginner
Quick Tip: Pair these with natural bleached linen and raw wood branches for a sophisticated table centerpiece.
48. Sunset Horizon Gradient Dip Eggs

Stunning horizon gradients capturing colors of dusk with horizontal bands of yellow, peach, and purple.
- Materials: Yellow, peach, and purple liquid dyes, shallow dipping cups, wire egg holder.
- Technique: Dip entire egg in yellow, lower two-thirds in peach, and bottom third in purple, drying between dips.
- Difficulty: Intermediate
Quick Tip: Dip in order of light to dark colors so darker pigments don’t muddy the bright yellow top section.
49. Celestial Night Sky & Constellation Eggs
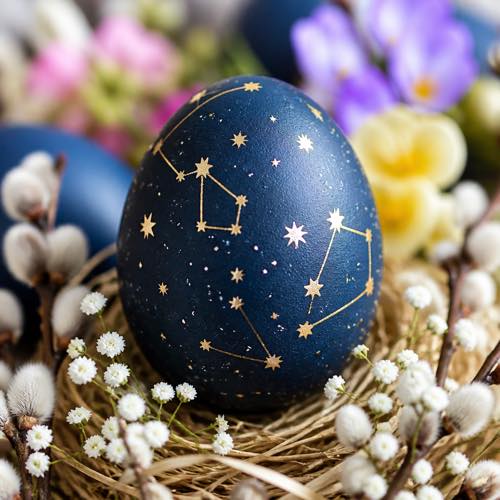
Dreamy astronomical eggs painted in midnight navy with metallic gold star charts, constellations, and moon phases.
- Materials: Midnight blue acrylic paint, metallic gold gel pen, white paint pen, toothbrush for splattering.
- Technique: Paint egg navy, flick tiny white star specks with a toothbrush, and connect constellations with gold pen.
- Difficulty: Intermediate
Quick Tip: Look up actual astrological constellations (Ursa Major, Orion, Cassiopeia) to make star charts authentic.
50. Concrete Finish Minimalist Eggs

Architectural, industrial-chic eggs with a tactile faux-concrete finish and crisp metallic accents.
- Materials: Gray textured stone spray paint or gray acrylic mixed with fine sand, metallic gold paint.
- Technique: Coat wooden craft eggs with textured gray paint, let cure, and dip bottom third in bright gold.
- Difficulty: Beginner to Intermediate
Quick Tip: Use wooden or craft foam eggs for textured stone paint; smooth natural shells can cause heavy spray to run.
Pro Tips for Decorating, Preserving, and Displaying Easter Eggs
To ensure your crafting session runs smoothly and your finished egg decorating ideas look stunning for weeks, keep these professional craft tips in mind:
- Food Safety with Dyed Eggs: If you plan to eat your hard-boiled creations, always use food-grade dyes, store eggs in the refrigerator, and consume within one week. Never eat eggs decorated with craft acrylics, nail polish, spray paint, or industrial adhesives.
- Preserving Hollow Eggs for Years: Blown-out eggs can last indefinitely if properly preserved. After blowing out the contents, rinse the hollow shell inside and out with a mild bleach-water solution to kill remaining bacteria, let dry completely for 48 hours, and seal with a clear UV-resistant acrylic spray.
- Crafting with Young Children: When working with toddlers and preschoolers, place eggs inside silicone muffin cups or plastic bottle caps to prevent rolling. Swap messy liquid dye bowls for food color droppers over paper towels or mess-free washi tape strips.
- Creative Display Ideas: Showcase your decorated eggs in unexpected vessels: rustic wire egg baskets lined with moss, antique wooden dough bowls, ceramic egg crates, glass bell jars, or hanging from spring pussy willow branches using glued ribbon loops.
Frequently Asked Questions About Egg Decorating Ideas
How do you decorate eggs without using chemical dyes?
You can create gorgeous chemical-free eggs using natural pantry ingredients: red onion skins yield rich copper and amber, shredded beets make soft pinks, ground turmeric produces brilliant golden yellow, and red cabbage creates stunning robins-egg blue. Alternatively, decorate raw white or brown eggs with washi tape, marker drawings, or pressed botanical flowers.
How do you blow out an egg safely without cracking the shell?
Pierce a small hole in both ends of a raw egg using a sharp pushpin. Insert a paperclip or toothpick into the bottom hole to break the yolk membrane. Place a flexible drinking straw or small nasal aspirator bulb over the top hole and gently blow the liquid contents out into a bowl. Rinse thoroughly and let dry.
What is the best way to make dyed eggs last without spoiling?
For temporary displays (up to one week), hard-boil eggs, keep them refrigerated, and display during mealtime. For permanent holiday keepsakes that you can bring out year after year, always use blown-out real eggshells, wooden craft eggs, or ceramic faux eggs sealed with clear acrylic spray.
Can you decorate brown eggs, and how do colors look on them?
Yes! Brown eggs produce rich, warm, earthy tones that look rustic and sophisticated. Natural botanical dyes (like onion skins and turmeric) look particularly deep and luxurious on brown shells. Opaque white acrylic paint pens and metallic gold leaf also pop brilliantly against natural brown eggshells.
Conclusion: Bring Your Easter Egg Decorating Ideas to Life
From simple, kid-friendly tie-dye creations to museum-worthy Ukrainian Pysanky and gilded gold leaf centerpieces, exploring creative egg decorating ideas transforms a humble eggshell into an extraordinary work of spring art. Gather your favorite materials, invite family and friends to join the fun, and celebrate the beauty of the spring season with these 50 inspiring designs!